Indoor Grow Calendar
This is an example marijuana grow schedule suitable for indoor marijuana growers who use pre-fertilized soil, but it can also be used by hydro growers. The marijuana grow schedule starts on the day you put the marijuana clones or seedlings in your growing space. So seedlings should already have a few internodes, and clones need to be well rooted. Read the schedule all the way through so you know what to expect.
Marijuana Grow Schedule for Vegetative

Week 1 Vegetative
- Light Quantity – 50% of the lamps on (400watt HPI)
- Light Distance – 3.2 ft (100cm) between lamp and plant
- Light Duration – 18 hours
- Temperature Day / Night – 73.4ºF / 64.4ºF (23ºC/18ºC)
- Humidity level – 80%
- pH level – 6.0
- EC – no nutrients
You want to let the marijuana plants get used to the light during the first week. If you have an HPI lamp, use it during the grow period. HPI light emits more white/blue light than HPS and this stimulates growth. Give your plants enough water for the first time so it flows out from the bottom of the pot. Wait to water them again until the plants have used up all the water. Spray your marijuana plants every day with a plant spray bottle to keep the humidity levels nice and high. You don’t have to add any fertilizer because it’s already present in the soil (hydro growers can start with EC 1.0).
Week 2 Vegetative
- Light Quantity – 100%
- Light distance – 1.6 ft (50cm)
- Light Duration – 18 hours
- Temperature Day / Night – 77ºF / 64.4ºF (25ºC/18ºC)
- Humidity level – 80%
- pH level – 6.0
- EC – 1.0
Turn on all the lights and reduce the distance between the lamp and top of the marijuana plant to 1.6 ft (50cm), but make sure it doesn’t get too hot. Also water your plants from below, this way the roots will search for the water and grow quickly in the bottom of the pot. You can add some extra nutrients, preferably with a high nitrogen product like grow booster. And if you want to prune your plant, this is the right moment. They still have plenty of time to grow. Aim a fan on its lowest setting just above the plants so it looks like they all ‘dance’ a little bit. This way they’ll get a firm stem. You can switch to bloom if you notice that the tips of the plant leaves touch each other so you know for sure that you’ll get a nice sea of green. Usually you can already switch after a week!
Flowering Week by Week with Pictures
Week 1 Flowering
- Light Quantity – 100% (600watt HPS)
- Light distance – 1.6 ft (50cm)
- Light Duration – 12 hours
- Temperature Day / Night – 77ºF / 64.4ºF (25ºC/18ºC)
- Humidity level – 70%
- pH level – 6.0
- EC – 1.2
By reducing the light duration from 18 to 12 hours, the plant ‘thinks’ the fall season is coming and begins to flower. It’ll take a couple of weeks before the first flowers become visible, and until that time the marijuana plant continues to grow nicely. Therefore the demand of nitrogen remains high. Make sure your swivel fan is aimed between the lamp and the plant. This way the hot air under the lamp is spreaded across the grow room, and you won’t damage the plants too much with strong winds. Also make sure that the bottom of the leaves are not getting damaged, or discolor due to insects or a shortage of nutrients, and watch out that the tips of the leaves do not ‘burn’ (become brown). This may indicate an overdose of nutrients.
Week 2 Flowering
- Light Quantity – 100%
- Light distance – 1.6 ft (50cm)
- Light Duration – 12 hours
- Temperature Day / Night – 78.1ºF / 64.4ºF (26ºC/18ºC)
- Humidity level – 70%
- pH level – 6.0
- EC – 1.3
Don’t prune the marijuana plant anymore. Pinching out is fine, which means removing the side shoots on the bottom, so the plant mainly uses its energy to create thick buds. Now they’re growing really fast, so you’ll need to monitor the distance between the plant and the lamp every day and adjust if necessary. If the upper leave begins to curl or discolor it is too warm, and the extractor fan needs to be at a higher setting, and the distance between lamp and plant needs to be greater. Increase the EC every week by 0.1, and you can see how your plants react to it. When you make sure that all the things mentioned above are done correctly you should have healthy green plants with thick stems and large leaves by now that can carry the weights of many heavy buds.
Week 3 Flowering
- Light Quantity – 100%
- Light distance – 1.6 ft (50cm)
- Light Duration – 12 hours
- Temperature Day / Night – 78.1ºF / 64.4ºF (26ºC/18ºC)
- Humidity level – 60%
- pH level – 6.0
- EC – 1.4
At this stage the root system of the marijuana plant has grown a lot and should come from underneath the pot. The first flowers has become visible, and the plant should continue to grow nicely. They consume the maximum amount of water now, so be sure that it’ll never be without it and the soil is always a bit damp. Feel it with your hand halfway in the pot and lift it up to check the moisture level. If you grow from regular seed you need to remove the males now before they fertilize the females and endanger the quality of the weed. Finish this week with a good rinse. Do not add fertilizer to the water, but do keep the pH at 6.
Week 4 Flowering
- Light Quantity – 100%
- Light distance – 1.6 ft (50cm)
- Light Duration – 12 hours
- Temperature Day / Night – 80.6ºF / 64.4ºF (27ºC/18ºC)
- Humidity level – 50%
- pH level – 6.0
- EC – 1.5
You’ll notice small buds everywhere, and the plant begins to smell really good. The Phosphorus (P) demand increases, so switch to a good bloom fertilizer such as bud booster. You should’ve rinsed it well last week without any fertilizer. This is to decrease the fertilizer with a high amount of nitrogen in the soil and plant, so the plant can absorb a good amount of phosphorus, and the small buds can quickly develop.
Week 5 Flowering
- Light Quantity – 100%
- Light distance – 1.6 ft (50cm)
- Light Duration – 12 hours
- Temperature Day / Night – 80.6ºF / 64.4ºF (27ºC/18ºC)
- Humidity level – 50%
- pH level – 6.0
- EC – 1.6
The marijuana plant will no longer continue to grow and will only focus on the production of buds. Make sure that there’s an optimal distance between the plant and the lamp, provide as much light as possible but don’t let it get too hot. The buds are even more sensitive to heat than the leaves. Insert a plant stick under a lamp and attach a thermometer to it to see how warm it really gets. Continue to feed them and pay extra attention to any damage to the leaves caused by insects or fertilizing problems. Also red stems are a sign of stress and may indicate certain problems.
Week 6 Flowering
- Light Quantity – 100%
- Light distance – 1.6 ft (50cm)
- Light Duration – 12 hours
- Temperature Day / Night – 80.6ºF / 64.4ºF (27ºC/18ºC)
- Humidity level – 50%
- pH level – 6.0
- EC – 1.7
The buds continue to develop, and the plant will consume the maximum amount of water and CO2. Make sure your fans stay on in order to provide the marijuana plants with fresh air. Also check to see that your plants are not drying out. This phase always takes long, and it doesn’t look like a lot of things are happening. The challenge is to optimally maintain the environmental conditions such as temperature, humidity and ventilation. Rinse your plants again at the end of the week with water not containing fertilizer, but do maintain a pH level of 6. This will help to stabilize the EC and pH levels of the plant and the soil again.
Week 7 Flowering
- Light Quantity – 100%
- Light distance – 1.6 ft (50cm)
- Light Duration – 12 hours
- Temperature Day / Night – 82.4ºF / 64.4ºF (28ºC/18ºC)
- Humidity level – 40%
- pH level – 6.0
- EC – 1.8
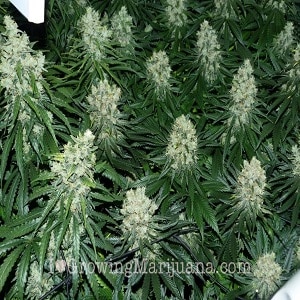
Your buds are now really starting to get some volume. The plant still needs nitrogen, phosphorus and other nutritious elements, but its most important requirement is now potassium. Use a product like THC booster to provide the plant with optimal nutrition. You will notice that slowly but surely there will be a somewhat of a white deposit on the small leaves around the buds. That’s is THC. The whiter the better. So feed your plant optimally. You will see that the first hairs will color orange.
Week 8 Flowering
- Light Quantity – 100%
- Light distance – 1.6 ft (50cm)
- Light Duration – 12 hours
- Temperature Day / Night – 82.4ºF / 64.4ºF (28ºC/18ºC)
- Humidity level – 40%
- pH level – 6.0
- EC – 1.8
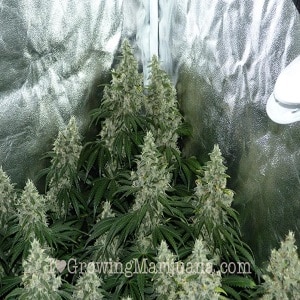
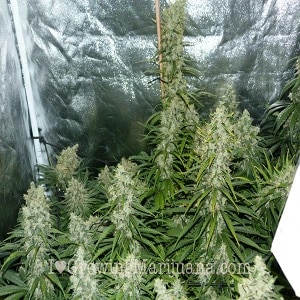
Now your buds go through their final growth spurt, but will primarily focus on compactness and THC production. It may happen that the lower leaves begin to turn yellow and slowly die, but that’s normal. It is not a nutrient deficiency, so keep feeding them. Check the buds every day for any mold or yellow/brown leaves. Immediately clip any suspicious things or upload your picture to our support page, you’ll get an answer to your question in no time.
Week 9 Flowering
- Light Quantity 100%
- Light distance 1.6 ft (50cm)
- Light Duration 12 hours
- Temperature Day / Night 82.4ºF / 64.4ºF (28ºC/18ºC)
- Humidity level 40%
- pH level 6.0
- EC 1.0
In order to get rid of all the nutrients in your marijuana plants you can significantly reduce the EC level. During the final one or two treatment(s), only give them water with a pH level of 6.0. This also rinses the soil which then you can use again for your next harvest. Keep all factors under control and check for rot or insects. Discoloration of the leaves is normal and slowly the hairs on the buds are also turning brown. If you think your plants are still using the maximum amount of water, and 80% of the hairs aren’t brown yet, you can let them sit for awhile longer. It is also a matter of taste.
In this marijuana grow schedule I placed 1 plant per square foot so I can always weed out any sick or infected plants that are not growing properly. Another advantage of growing one plant per square foot is that you don’t have to vegetate them for weeks.